5 Immediate Steps to Handle Water Damage Emergency

You may not expect it. But one day, somehow, it’s very likely that a water damage emergency will impact your property. 

For most homes, water damage emergencies occur during floods or storms. However, such emergencies may also arise due to plumbing issues or leakages that go on for several hours.

When it occurs, water damage can be devastating. It not only threatens the value of your property, but it can also make it unsafe for the occupants. Plus, it can potentially result in massive structural damage and inflated repair costs.

What steps should you take to handle a water damage emergency?

You can never exactly predict or prepare for when and how it might arise. Nevertheless, a prompt response is vital to preventing further damage water can cause.

In case of water damage emergency, make sure to:

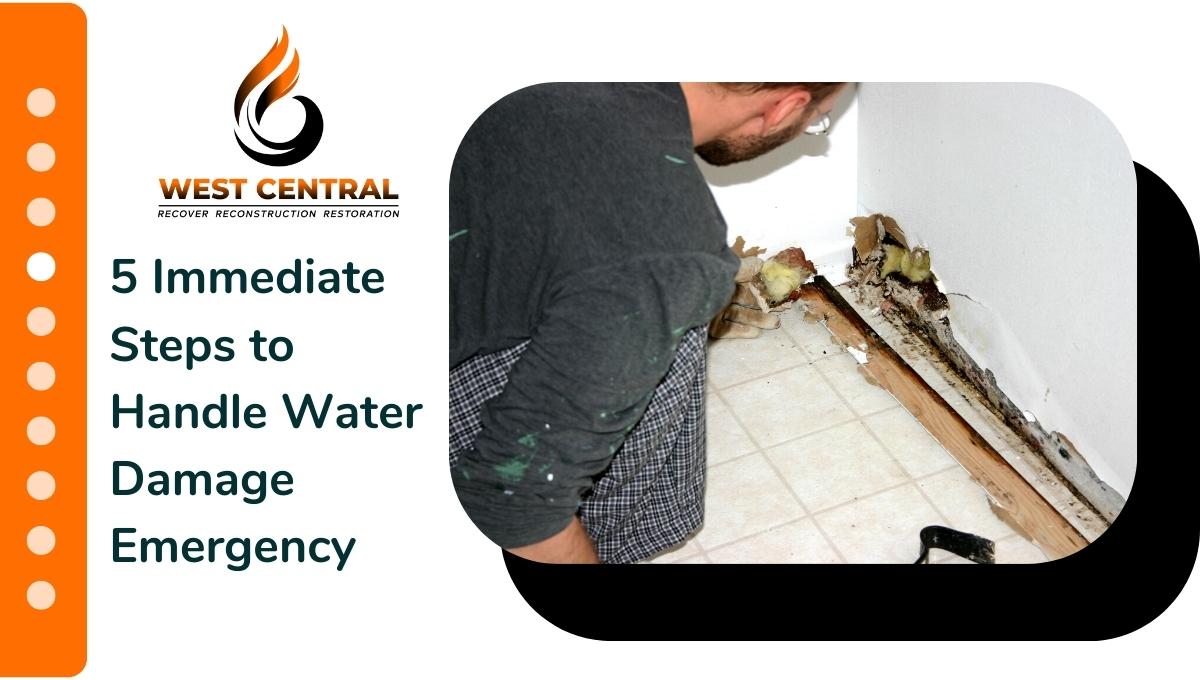
  1. Quickly identify and fix the source of the water

Prevention is key. The quicker you can stop the inflow of water into your home, the more potential damage you can prevent. 

So when there is a leakage in your home, the first step you should take is to identify and locate the source of the water. 

If the water comes from a pipe, shut off the valves. And if it is due to flooding, take the necessary measures to protect your home from the flood.  

  1. Evacuate the occupants of your property to a safe area

If the amount of water involved poses any risk to human life, you should make sure that all the occupants of the home are evacuated and taken to a safer building or area. 

You should also safely switch off power to the property and unplug all electrical devices to eliminate the risk of electrocution. Remember, electricity conducts through water and can be fatal.

  1. Protect valuable items

One of the problems associated with water leakage and flooding is loss or destruction of valuable items. So if you can get inside your property after water damage, then you should prioritize protection of your precious items from soaking water and being damaged. 

Move your furniture from affected areas to protect them from potential mold growth. Also, dry various items, such as carpets, clothing and curtains, thoroughly to prevent mildew. 

  1. Contact your insurance company

Water damage can cause huge losses.  And you’ll need your homeowner insurance provider to help you recover various items lost during the emergency.

It is advisable that you call your insurance provider as soon as a water damage emergency arises. Ask the provider about the steps you should take and what they expect from you.

The company is likely to send a claims adjuster to your home immediately. The adjuster will assess the damage, estimate the losses, and recommend a settled claim for compensation.

Thoroughly document the damages through photos and videos in order to make a compelling claim that will help make your case. As the claim progresses, consider keeping the receipts and all the records of the proceedings with the insurance company. 

  1. Clean and restore your home

The extent of cleaning and restoration will depend on the amount of damage. For a small, manageable damage, you can simply involve yourself and family. Make sure all of the cleaning is prompt and thorough in order to prevent further damage and the growth of mold.

For a massive water damage emergency, a lot of effort and time may be required to restore your home. So it’s advisable to involve professionals to assist with the restoration as soon as is practicable. 

Professional technicians are skilled in salvaging valuable items, replacing carpets, flooring and wooden surfaces, and assessing water damage, including water that gets into hidden places.

At West Central Equipment and Restoration, we offer water damage restoration services designed to address all manner of emergencies. 

We understand the fundamentals of assessing water damage, fixing leakages, extracting flood water, salvaging items, repairing and restoring affected areas as well as preventing mold growth. 

For more information on emergency water damage restoration, visit the site “West Central Equipment and Restoration.”

How do you fix water damaged walls?

Walls can be damaged by water due to a burst pipe or extreme weather elements. But long-term wall damage is often due to hidden water leaks. The small, persistent drops of water hidden in your home can eventually lead to serious structural issues, including the catastrophic damaging of walls. 

How do you detect water damage on walls?

Simply look for the signs of water damage on or around the walls. The most common signs include:

  1. Stains on the walls
  2. Flaking or peeling paint
  3. Soft or swollen drywall
  4. Warped walls
  5. A strange or musty smell in the house
  6. Mold on the walls

Always be on the lookout for these signs. As doing so helps to detect and fix any water damage as soon as possible.  Remember, not fixing water damage early enough may result in the wall decaying, falling, or posing major risks to your living space.

How do you fix water damaged walls?

  1. Fix water leakage
    Before repairing a water damaged wall, locate and repair any leaking areas.  Check for dripping areas, moisture-filled spaces, and soggy or crumbling places in your home and fix them.
    Broken pipes, leaking drainages, and porous roofs are also common water leak sources that you should look out for. For more severe water leakage, seek the services of an expert. 
  2. Get rid of water damaged drywall
    In most cases, water damaged walls can’t be repaired. In fact, repairing damaged walls always result in need for further repairs in a couple of weeks. 
    So depending on the severity of the damage, a wise step is usually to cut out the damaged portions, particularly if the structure is compromised and the wall is prone to falling. You can use a wrecking bar, a hammer, or a keyhole saw to eliminate the damaged surfaces. 
    The debris can make the work area messy.  Hence, before you remove the damaged parts spread the surface with an old cloth or rug and collect the debris together with the damaged walls. 
  3. Conduct thorough, methodical repairs
    The manner of repairing a damaged wall depends on the complexity of the damage.  For walls damaged to a smaller extent, just scraping flaky and peeling areas out and then flattening the surface is often enough.
    But for bigger or wider damages, cutting out and removing the damaged area is usually necessary. So, cut the area out in a hole-like shape, then scrap the area backward, and peel it off without breaking its essential parts.
    For the repair, you need a joint compound, cement, and a means of making the repaired area smooth.  When repairing a smaller area (less than 6 inches in diameter), spread a joint compound thinly over the damaged area and apply the top layer using sandpaper to enhance the repair.
    And for a larger area (6-12 inches in diameter), mix some cement and apply. Patch up the area and allow the cement adhesive to dry. Now, fill the section with the joint compound, smoothen the entire area, and allow it to dry. You may require up to 3 layers of the joint compound to evenly patch up the area.
    For walls where moisture damaged areas are bigger than 12 inches in diameter, doing the repair by yourself may not help. It is prudent to opt for a professional water damage service.
  4. Paint the repaired wall
    After the repaired wall dries, prepare it for painting. Make sure the surface is smooth and use an appropriate water-based primer to seal the surface and make it ready for painting. 
    Once the wall is ready, you can now paint it. Paint using zigzag motions with overlapping W-like strokes. But start from right to left, then left to right; and do so repeatedly, ensuring the vertical strokes spread evenly. 
    Aim for a light, even and appealing coverage by using light strokes from bottom to top. You can blend the paint if it doesn’t have a flat finish. Otherwise, you can work on large areas by dividing the surfaces into squares and painting two at a time. 
    Equally, you can use a paintbrush to cover the areas your roller cannot cover. Here is a tip: paint once in one direction, overlap, and finish with non-diagonal strokes. Also, wait for the surface to dry before repeating for better results. 
  5. Clean up
    Once done, collect the debris and tidy up the space. You can dispose of harmful objects and rinse your tools before storing them appropriately. 
    Professional water damage restoration
    Keeping intact, appealing walls requires a proactive approach. So, never wait till a massive, overwhelming damage occurs. Instead, always be on the lookout for water leakage, fix any leaks as soon as you notice them, and repair the damages immediately.

At West Central Equipment and Restoration, we provide homeowners with the information they need to inspect their homes for signs of water damage. And for those with persistent water damage issues, we offer a comprehensive inspection and restoration service.

Do not hesitate to call us when your home becomes a victim to water damage. Or when you have concerns regarding water damage and need expert advice. We provide a 24/7 emergency water damage restoration service in Lecanto, Florida and will respond to your distress call as soon as you reach out. 

For more information on water damage restoration, visit the site “West Central Equipment and Restoration.”

What Can Be Safely Salvaged After Fire Damage?

A fire outbreak in your property carries with it a huge destructive power. In a matter of minutes, it can burn up all your possessions. And in most cases, you will have to throw away quite a number of items that are irrecoverably damaged.

But there are also some items in your home that can withstand the fire damage.  Such items can be salvaged during the home restoration process, and can help minimize the psychological impact of the fire incident on your family. 

So what can you safely salvage after fire damage?

You can salvage any item that is strong enough to survive the heat and the flames without absorbing water and smoke. Some will be stained, but with a little cleaning you’ll restore them to a state where they can be used.

If you need help cleaning salvageable items after a fire, contact a professional restoration service. They will provide expert advice on how to correctly salvage items and how to get your home back to a livable condition.

  1. Clothing, curtains, bedding, towels

After the fire, you will be forced to throw away burned or charred textiles. However, for clothes, towels, curtains and bedding with only minor soot stains or water exposure, you can wash them thoroughly and use them. 

Put all the cloth items that have not burnt or charred into the washing machine, then add 4-6 tablespoons of tri-sodium phosphate and one cup of chlorine bleach. Use cold water to clean and rinse the cloth items.

Many of these items can get clean again and will be free from the smell of smoke and chemicals. Make certain to dry them properly before putting them back into use. And if washing fails to remove the smell of smoke from the fabrics, get the help of a professional odor removal service.

Just make sure to be careful when it comes to children’s bedding, clothes, and toys. Children generally have much more sensitive skin. So any chemicals on the fabric can irritate their skin.

  1. Glass and Ceramic

When comparing ceramic to glass, glass stands out because it can be salvaged easily. In case of a fire, glass objects are often not badly destroyed, but only get covered in soot, which is easier to wash away. 

Ideally it’s better to clean the affected glass using soap and vinegar, though professional cleaning may be necessary for best results. By nature, ceramics are porous. This makes them vulnerable to being damaged by smoke and water. But some ceramics that can still be used and restored by a professional cleaning service.

  1. Hardwood Flooring

Though hardwood floors are porous, they are usually protected by a coating and seal. So in the event of a fire, the coating may reduce the damage and prevent the smoke and water from reaching the porous portions of the hardwood flooring.

Therefore, unless they are completely burnt or charred, you can clean your hardwood flooring with soap, sand them down, and refinish them to their original state. And when necessary, you can get help from a professional restoration service to assist you salvage the flooring instead of spending thousands of dollars replacing them.

  1. Metallic items

Metallic items are some of the toughest in your home. Because metals have high melting points, they aren’t susceptible to fire and smoke damage. They are also easy to dry.

So while metallic items in your home will stain a bit, you can usually remove the stains by using simple vinegar and dish soap then rinsing the items with water. Once the items are clean, you can allow them to stand in sunshine for a few hours and then give them a fresh coat of paint. They should be as good as new.

Though a house fire can be devastating, salvaging some items can quickly restore a sense of normalcy after the fire. In most cases, you’ll be able to salvage items that are hard, non-porous and washable as they can survive the fire, smoke, water, and possible mold damage.

At West Central Equipment and Restoration, we work with homeowners to minimize the impact of fire accidents on their life. We will help you identify any items you can salvage, assist you through the cleaning and pack-out, and help you get back to your home after the restoration process. 

For more information on fire, water and mold restoration, visit the site “West Central Equipment and Restoration.”

How do you clean up after a water leak?

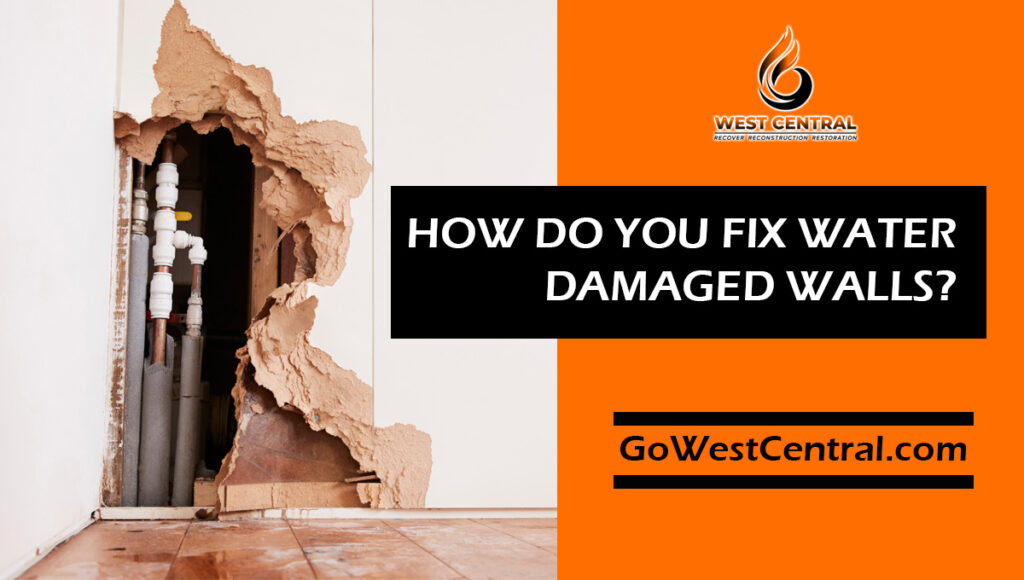
Any water leak in your property is likely to leave a big mess. And so while your plumber will do the necessary repairs to have your plumbing system working well again, you’ll need to clean up and dry things out after the leak. Because water can quickly cause serious damage, the cleanup should start as soon as possible.

For a small leak affecting a small area, typically limited to one room, you can do the cleanup yourself. But if there is a massive leakage that is affecting several rooms or has gone unnoticed for over 8 hours, then you’ll need the help of a professional water mitigation team with specialized equipment.

So how do you clean up after a water leak?

  1. Your safety comes first

The water-damage structures may not be safe. So you must be completely sure that the structures are safe before you do any leakage cleanup. For example, if there is unusual noise or shifting, then you should leave the structure immediately and have professionals assess the structure.

But if the structure is safe, you can proceed with water leakage cleanup. And just before you do anything, wear rubber gloves, rubber boots, dust masks, and eye protection device to shield yourself from potential infection or injury. 

For a flood that is several inches deep and is above the power outlet line or has occurred near an electrical appliance, make certain to shut off power to the property to prevent the risk of electrocution. You may need to call an electrician if the circuit-breaker box is out of reach.

You may also need to call your plumber or gas utility to relight or replace submerged parts of your gas water heater to avoid disaster. 

  1. Salvage valuable items

With your safety guaranteed, your next step is to remove important possessions from the affected area. Take out furniture, soaked carpets and other removable items from the flooded area. 

If you do this quickly, you’ll be able to salvage a good number of your valuable items. Of course, some items may not be salvageable depending on how much water they absorbed. But removing them also clears up space, allows you to work more efficiently, and prevents the growth of mold and mildew.

Later on, you’ll need to disinfect these items—anything that touches standing water must be disinfected. Plus, you’ll need to keep your sofa and chair skirts and draperies from touching wet surfaces. 

  1. Removing standing water

Use towels and a mop to remove any water that remains on the floor. As an alternative, you can use a wet-dry vacuum to remove a couple of inches of standing water. You can rent a wet vacuum from your nearby hardware or home improvement store if you don’t own one. But if the standing water is deeper, call for professional help. 

For roof leaks, you can poke a hole in the sagging ceiling to prevent collapse then use a bucket to collect the draining water.

  1. Freshen things up indoors

Clear indoor and outdoor drains to ensure any standing water flows out. And if the weather permits, you should open doors, windows, closets, and storage spaces to bring in fresh, dry air. This will allow everything to dry thoroughly. Avoid occupying until 10 hours after drying is complete.

Also, run fans and a dehumidifier in the affected area to ensure moisture is completely removed from your home and does not end up penetrating furnishings. 

To disinfect affected surfaces, use hot water and soap to scrub walls, floors and any other surfaces people are likely to touch. Then sanitize the cleaned surfaces with a disinfectant solution prepared by adding 1 ounce household bleach to 4 gallons of water.

  1. Thoroughly inspect your property

You have dealt with the present problem, but you must also take steps to prevent a future leakage. So make sure to inspect the roof for leaks or damages, particularly areas around vents. Check gutters, downspouts, and all basement windows.

It’s equally important to check the grade of your property to ensure it slopes away from its foundation—use fill dirt to eliminate low areas. And seal basement cracks with hydraulic cement or masonry caulk. Elevating furniture and valuable items stored in basement blocks or shelves also helps in case of small leaks.

Make sure to check with your home insurance company the details of your policy coverage and the specific filing requirements. Keep all receipts with you. Likewise, only invite professional inspectors or engineers to your property when you suspect structural damage. For issues with trees, call a trained arborist.

Exceptional, professional water damage cleanup

For a massive plumbing accident with widespread water damage, you’ll need to contact a professional restoration company. At West Central Equipment and Restoration, we are skilled and experienced in flood water cleanup and will help you salvage precious items and prevent mold growth through a swift, methodical flood damage restoration process.

Call us if you suspect that water has seeped into the drywall or sub-flooring of your property.  And even in a case of a small leakage, you should call us to help you if the leak has taken several hours and porous materials have been exposed to water saturation. 

With our advanced imaging technology, moisture readers and professional-grade drying equipment, we will help prevent secondary damages from becoming a bigger issue. In turn, we help protect your health and ensure longevity of the structural integrity of your property. 

For more information on water damage restoration and mitigation, visit West Central Equipment and Restoration https://gowestcentral.com/

How Does Mold Spread in the House?

Mold is a fungus that grows from airborne microscopic spores found almost everywhere in the environment. Usually the spores are inactive, but when temperature exceeds 65 degrees or humidity surpasses 70-percent, they start to grow and flourish.

A typical mold spore is roughly 0.0002 inches in size (10 microns). And it can optimally grow anywhere in your home as long as there is adequate humidity, food, and warmth. In fact, mold grows throughout the year in any home; regardless of how clean it is, though an infestation usually takes 1-14 days to become apparent.

At first, a cluster of mold spores spreads on the surface. Then the spores in the cluster begin to reproduce. With gradual increase in the number of fungi, the mold growth becomes noticeable to the human eye. 

In most cases, homeowners become aware of the presence of mold in their homes only after they see it or smell a damp, stuffy, moldy odor. But at times, the growth is only realized when there is an increased flare up asthma or allergies.

What are the key factors behind indoor mold growth?

For mold to grow in your home, spores must be present. There must also be a surface for them to grow, warmth, oxygen, and darkness. When moisture becomes available in a home with these ingredients—whether as stagnant water, a water leak or high level of humidity—mold problems begin.

Most often, the smaller mold spores appear like dirt or soot, which makes them quite easy to ignore.  So it is always advisable not to ignore any suspicious dirty or sooty material on surfaces. 

Make sure to call mold remediation technicians at the earliest sign of mold; as it is the often ignored pockets of mold that eventually establish huge colonies and end up spreading throughout a home.

How does mold spread in the house?

So long as there is mold in the crawl space or basement, the spores will rise throughout your home—what is called the “Stack Effect”. By stack effect it means that the rise and exit of warm air through the upper levels and the attic creates a vacuum on the lower level, which draws air upward from the basement and crawl space. 

 In turn, mold spores, odors, dust mites, and other airborne particles are drawn into the main area of the home. Then, once the spores access the main area of your home, they are nourished and flourish on any organic materials they can find,  including wood, dust, wallpaper, fabric, and paint for nourishment. 

The mold feed on these materials, and keep growing and spreading. But mold can also digest synthetic materials, such as pastes, adhesives, and paints. While mold cannot obtain nutrients from inorganic materials like glass and concrete, it will grow on the dirt present on the surfaces of these materials.

What should you do if you suspect mold in your home?

Start by determining the source of the moisture that is enabling the mold to grow. Fixing the moisture problem will stop further growth and spread of the mold.  Also, make sure to dry out everything once you have dealt with the moisture problem. 

Next, you should remove and clean up the mold. You can use fans and dehumidifiers to speed the process, but must never use fans for visible mold as this can cause mold spores to spread. Wear protective devices, such as a long-sleeved shirt, rubber gloves, eye goggles, long pants, and filter dust mask, before doing mold cleanup.

Once you are done with the cleaning, make sure to dispose any moldy materials. For the clothes and protective devices you wear during mold cleanup, put them in a plastic bag and discard or launder them before you leave the contaminated areas to avoid spreading mold spores through your home.

Bag and dispose porous moldy items, such as insulation, plaster, plasterboard, ceiling tiles, paper products, and some wooden items. But for non-porous and semi-porous materials, including metal, glass, hard plastic, and solid wood, make sure to clean them with a HEPA vacuum (high-quality HEPA filter) to remove the contamination.

If the mold growth is in the crawl space, basement, attic or any area that makes it difficult to get rid of, then call a professional mold remediation service. The experts have the skills and equipment to help detect and completely remove any form of mold growth

At West Central Equipment and Restoration, we use techniques and solutions that yield great results. We have a track record of successful elimination of a wide range of mold infestations and will use our wealth of experience, advanced equipment, and efficient techniques to rid your home of whatever type of mold.

We guarantee improved indoor air quality after our painstaking mold remediation process. Call us today to find out how we can help you get your home to its best condition. For more information on mold remediation, visit the site “West Central Equipment and Restoration.”

How fast does mold grow after a water leak?

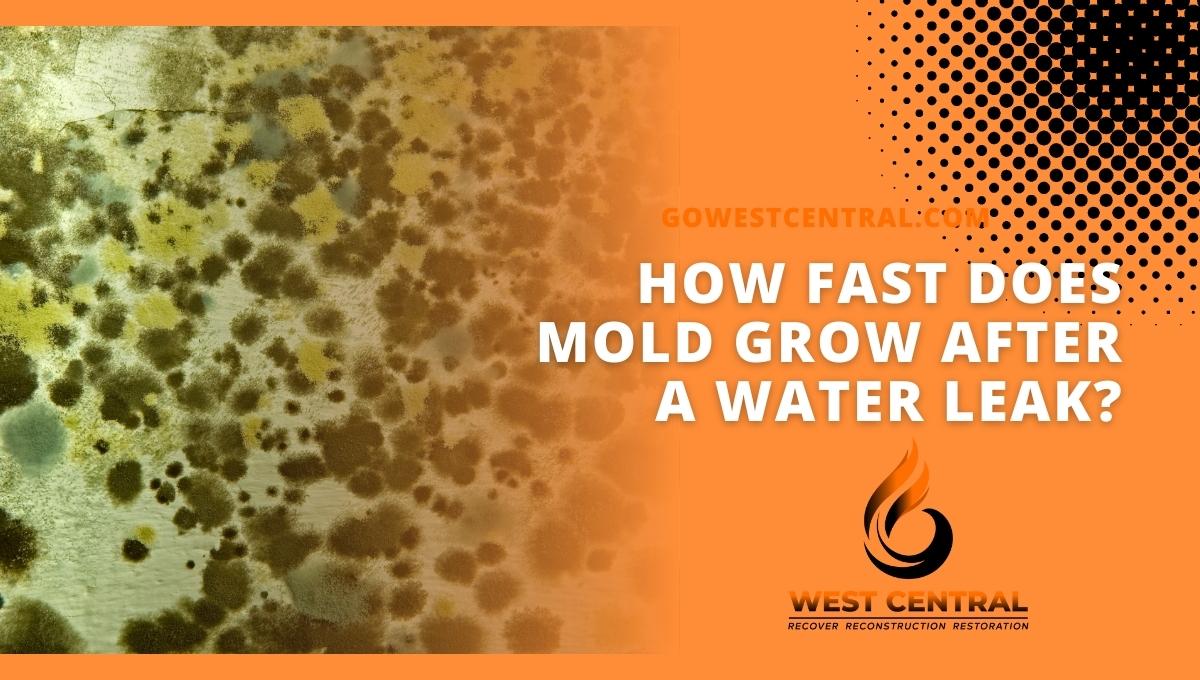
Mold is unsafe fungi that grow in moist environments. It takes root in a home through airborne spores, which germinate as soon as they find suitable conditions of humidity and temperature. 

Once it begins to grow, mold spreads quickly till it takes over the entire home. While it takes 24 to 48 hours for mold to begin to grow in a home, it usually takes a week or more for the growth to be visible.

Unfortunately, by the time mold has established a noticeable growth, it tends to have settled into damp and porous surfaces and spread too deeply. This makes it difficult to eliminate.

So how fast does mold grow after a water leak?

This depends mainly on how long the dirty water takes in your home before it is removed.  If a water leak occurs and is quickly cleaned and dried, mold growth is either completely eliminated or massively slowed down. 

This is the reason why urgent action is usually necessary after a plumbing accident as it saves the home from the danger of mold growth. Doing the repairs right after water damage also goes a long way in controlling indoor moisture level, which in turn prevents mold growth

On the contrary, if a leak occurs and the water remains lying in a spot for more than 8 hours to a couple of days, there is a higher likelihood of mold growing in that area and then rapidly spreading. 

Typically, a significant mold growth begins within 24 to 48 hours after a water leak if the leakage creates an ideal condition for mold to thrive. The growth will then spread quickly and take hold of the home within 12 days.

At West Central Equipment and Restoration, we encourage homeowners to make sure there are no unnecessary damp conditions in their homes that can lead to mold growth. Plus, we always emphasize the need to act fast to remove the water and to repair the damage urgently. 

For it usually takes just a few days for mold to take over a home, grow on every possible surface and cause untold damage. When inhaled, mold can cause all sorts of health issues in humans and animals, varying from mild to serious.

Factors that determine how fast mold grow in your home

  1. Temperature of your home

After a water leak, the temperature inside your home will determine whether mold grows or not. For a home that is always warm, mold spores will find it ideal for growth. 

A good deterrent to mold is keeping your home cool to slow down regeneration of the spores and give you a better chance of tackling the problem before it gets worse.

  1. Ventilation in your home

Mold finds it difficult to grow in an airy and dry home. So make sure your home is properly ventilated and dry as this will help slow down the growth and spread of mold.

  1. Presence of organic surfaces

Mold spores feed on and grow quickly on organic surfaces, such as wall paint. You can invest in inorganic wall paint and cut on organic surfaces in your home to slow down the growth and spread of mold.

How can you prevent mold growth after a water leak?

You can expect visible mold growth in your home between 48-72 hours after a water leak. But it always does not follow that mold will grow only after obvious water damage. 

As long as there are wet patches around your home, an unexpected drop in water pressure or a sharp increase in your bill, there could be a leakage somewhere that is likely to trigger mold growth. Hence, it is advisable to call in a water leak detection service to help as soon as you notice these changes.

Once you identify the leaking spot, you should dry all the affected areas thoroughly. Make sure not only to dry the obvious floor areas, but also to get into any fractures, nooks and crannies where the water might have leaked to. 

Likewise, remove the drywall, rugs, and baseboards and thoroughly dry the underlying surfaces. Opening windows and doors also helps to provide airflow to affected areas.

After removing excess water and drying affected areas, use a vacuum or carpet cleaner to suck up water from hard-to-reach areas. Alternatively, you can push towels in between the fractures and crevices of walls and carpets.

Timely, efficient water damage remediation

As a responsible home owner, you should never allow water to stand for long after a leak inside your home. Make sure to remove the water quickly, dry the affected areas, get timely repairs, and eliminate all conditions that may allow mold to thrive. 

In case of a flood that is too big for you to handle, call a professional water damage remediation service to correctly restore your home.

At West Central Equipment and Restoration, we provide prompt, reliable and efficient water damage and mold remediation. Our certified technicians are experienced in dealing with all manner of plumbing accidents, water damages, and mold growth.

So if you are located in Lecanto, Florida, make sure to call West Central whenever you have a sizeable water leak or need help with mold remediation. For more information on mold remediation and water damage restoration, visit the site “West Central Equipment and Restoration.”

Mold Remediation in Tampa, FL

Mold can be a threat to your property anytime. After all, mold spores are a natural part of the environment. So they can easily gain access to your home through the air and with just a little change in the indoor conditions, they can quickly establish a growth. 

Generally, though, moisture is the biggest cause of mold growth. In fact, within 48 hours of increased moisture, usually due to water damage or high humidity, mold will start growing and then spread rapidly if not removed. The mold will in turn destroy surfaces it grows on and contribute to adverse health conditions, such as allergies and respiratory infections.

That is why the mold should be removed quickly and efficiently.

At West Central Equipment and Restoration, we provide swift, reliable and affordable mold remediation services in Tampa, FL for residential and commercial property. Using tested and proven equipment and techniques, we clear up the mold fast and take effective steps to prevent growths.

Professional budget-friendly mold remediation

When not tackled properly, a mold problem can end up getting worse. The mold growth can spread way beneath the flooring, into air ducts, and into the air. Plus, the invasive nature of mold makes tackling the problem a hard and disruptive process that if not handled skillfully may require demolitions and reconstruction of part of the property.

At West Central Equipment and Restoration, our technicians in Tampa have the skills and experience to track mold to all its favorite hiding spots.  Through innovative approaches, we are able to reach all the nooks and crannies where the fungus may hide and get rid of them with no traces left behind.

And because we consider high quality indoor air a basic human need, we make sure that our effective mold remediation service is not beyond reach due to the cost or to any inconveniences. 

We apply mold remediation solutions that are healthier, environmentally friendly, less-intrusive, and budget-friendly. Compared to other mold remediation service providers, we treat mold growths in less time, at a lower cost, and with no need to demolish and reconstruct parts of your property.

What can you expect from us?

  1. A tailor-made mold eradication protocol that will ensure the mold growth is completely gone.
  2. A close working relationship with you and your homeowner insurance company.
  3. A team of skilled, knowledgeable and certified technicians to handle mold removal.
  4. A clear pricing guideline and standardized line item descriptions
  5. A detailed operational procedure
  6. A consistent service that keeps you informed of the progress of the mold remediation process
  7. Capacity to take care of your other needs, such as water damage restoration and pack-out services.

What should you do when you detect mold in your property?

  1. Call West Central Equipment and Restoration to remove the mold and stop further spread.
  2. Always wear protective equipment like gloves, a mask, and eye wear when dealing with the mold.
  3. Dry off unaffected floor and wall areas to prevent the spread of the damage; but do not touch affected areas.
  4. Turn on fans and dehumidifiers to dry the property and minimize moisture.
  5. Close windows when it is raining

You must never:

  1. Try cleaning the mold yourself as this can cause further spread.
  2. Touch the mold since many strains of mold are toxic to humans.
  3. Put a fan or dehumidifier into direct contact with the mold.
  4. Cover the surfaces already affected by the mold.

Are you having mold in your home or business premise in Tampa, FL? Contact West Central Equipment and Restoration now for a trustworthy, efficient mold removal. 

We are passionate about doing a good job and have the personnel and equipment to tackle any kind of mold contamination. Plus, we offer a wide range of other disaster restoration services. 

For more information on effective mold remediation in Tampa, Fl, visit the site “West Central Equipment and Restoration.”

What is flood remediation?

Flood remediation refers to the activities carried out after a flood damage to reverse or cure the damage caused by unwanted water accumulation. It involves cleaning up, drying, and sanitizing affected areas. 

Usually, after a flood, the recovery process has three phases:

  1. Mitigating water damage, which involves tackling the damage left behind after the flood and minimizing further damage
  2. Flood remediation, which involves cleaning, drying, and sanitizing affected areas and materials
  3. Reconstruction work that ensures the property goes back to its pre-flood condition

At West Central Equipment and Restoration, we know that most flood waters contain refuse, deceased animals, feces, soil and other debris. And this can and does leave a foul-smelling sledge on every surface of your home. 

Also, the water can collect behind walls and areas that you can’t see, resulting in dangerous mold. And worse, the leftover standing water can enable microbial growth in fabrics like carpet and even drywall.

So we will act swiftly, boldly and professionally to eliminate the health threats that the flood water may bring to your home. After you contact us, we will:

  1. Gather information from you over the phone and make arrangements to reach your property immediately.
  2. Quickly and accurately assess the flood damage situation as soon as we arrive in order to know what activities to prioritize.
  3. Determine the scope of work required
  4. Ask you to sign a work authorization form to give us legal access to your property
  5. Extract standing water quickly
  6. Go on with the remediation and restoration work

So how is flood remediation done?

  1. Salvaging items

Part of flood remediation is saving and cleaning items from flooded areas.  Of course, certain items such as pillows, box springs and mattresses are porous and will be full of multiplying microbes so they can’t be restored. We’ll help you itemize such items for insurance purposes before we dispose of them.

But for items that can be salvaged from your property, we will quickly remove, clean, and store them before we proceed with other remediation steps.

We will make sure to salvage precious items including:

  1. Solid wood furniture that isn’t padded or cushioned
  2. Photographs and critical paper documents
  3. Drapes, clothing, area rugs, and other fabrics
  4. Large appliances that have not been submerged
  5. Various electronics, including computers
  6. Cleaning affected areas

Protecting themselves with gloves, goggles, boots, gowns, and respirators, our flood remediation technicians will move in quickly, turn off gas and electricity and begin the cleanup process. We will employ water extractors, pumps or vacuums to remove all standing water from cavities and from all soaked materials.

Materials that may stain the floors and walls are also removed. They may include curtains, rugs, pot plants, wood, books, and metal furniture. Mud is shoveled out, and the walls and floors are scrubbed before being disinfected with bleach solution. 

  1. Drying and dehumidifying the space

When there is minor flooding, the drying process takes a few days. But in case of a major flooding, the drying process may take a week or longer and may require sophisticated equipment.  

In short, wet-dry vacuums are used to thoroughly clean and dry the carpet, floors and walls. Then air dehumidifiers are placed in affected areas to dry them quickly and prevent mold growth. Mild chemical treatment may also be used to kill existing mold, preventing potential spread.

For porous materials such as drywall and wood, extensive structural drying techniques are used. A combination of centrifugal air movers, heavy-duty dehumidifiers, aerodynamic axial fans, and hardwood floor drying systems are used.

  1. Sanitizing everything

Since flood water is unsafe, everything that comes into contact with it should be sanitized. Even if your home was flooded with gray water that did not contain pathogens, we will still sanitize to guarantee safety. We use powerful disinfectants during this process, but are quite careful on where and how we apply disinfectant solutions on various items or surfaces, especially wooden furniture.

Timely flood damage remediation

At West Central Equipment and Restoration, we offer emergency flood damage remediation 24/7. We’ll reach you quickly to help with your flood damage emergency, mitigate the damage, and embark on remediation and restoration. 

Our process involves:

  1. Initial inspection
  2. Water extraction
  3. Cleaning of structural elements and furnishings
  4. Deodorization
  5. Dehumidification (drying by air movement)
  6. Structural repairs
  7. Mold prevention
  8. Restoration

We are proud of our advanced equipment and supplies, such as:

  1. Moisture meters for detecting wet areas
  2. Professional pressure cleaners
  3. Self-contained vacuum equipment
  4. Negative air machines with HEPA filters
  5. Mold-killing and antibacterial solutions
  6. Fans, air dehumidifiers, and heaters
  7. Generators (when power is not available)

You can count on us to do a great job. For more information on flood damage remediation and restoration, visit the site “West Central Equipment and Restoration.”

How do professionals remove mold?

Mold is such a stubborn growth.

You scrub it off, it comes back.

You clean it, it resurfaces.

You may find yourself giving up—holding to the false belief that mold is impossible to eradicate.

That is where professional technicians come in. Those who have experience eradicating mold and who know how to clean it up properly.

So how do professionals remove mold?

1. In-depth inspection

Professionals don’t work blindly. They know what they intend to achieve even before they begin. And how do they know? Well, they begin by identifying the root cause of the problem through a painstaking inspection.

The first thing they do is to locate and target the source of moisture that’s feeding the mold. Is it a water leak? Is it due to condensation? Or is it due to rising dampness?  

A technician will also employ tools such as moisture meters, particle counters, and infra-red cameras to discover where the problem lies.

2. Sealing off affected areas

If there is mold already in your home and needs to be removed it must not spread to areas not yet affected. So the first order of business is to  seal off the affected areas to prevent mold spores from dispersing to other areas of your home by using plastic sheeting.

3. Physically remove the mold

Mold remediation begins with growths on hard surfaces. A formulated solution is applied to walls, floors, timbers, ceilings, and other affected surfaces to break down and remove the mold. The objective is to remove all visible signs of mold from your home.

4. Eliminate airborne spores

While visible growths of mold have been removed the air in your home may still contain invisible spores. So the next step is to rid the air of all mold spores and to improve indoor air quality. Professionals in remediation will use HEPA air scrubbers, HEPA air filters, and negative air controls to cycle out dirty moldy air with clean fresh air. 

HEPA filters are able to capture fine particles as small as mold spores which regular filters don’t work and could make the problem worse. When filtration is complete, mold-targeted fogging treatment is done in roof spaces, subfloors, and around the interior.

5. Demolish and discard porous building materials

When mold growth finds porous materials it can reach deeper areas and become impossible to eradicate. 

So the best option with moldy porous materials such as drywall, insulation, and baseboards is to simply discard them. These materials are often relatively inexpensive to replace and difficult to impossible to restore to their previous uncontaminated condition. 

After discarding the materials, remediation technicians will clean any remaining mold and mold stains using antimicrobial chemicals. Then they will commonly apply a sealant or encapsulant to make treated areas more resistant to water damage and mold in the future. 

Why opt for professional mold remediation?

1. Professionals will discover and identify mold growths in your property—whether visible, hidden or dormant spores—and kill all types of mold, including black mold.

2. Remediation technicians will use proper safety gear, such as high quality, high filtration face masks, vinyl or neoprene gloves, and a full protective suit.

3. Professionals will use effective equipment such as HEPA (high efficiency particulate air) air scrubbers, HEPA vacuum, and commercial strength dehumidifiers to remove mold in a speedy manner.

4. Experienced technicians will find and eliminate the source of the mold growth—such as leaks or moist materials.

5. Professionals will take action to prevent future mold growths by replacing affected materials and applying special products that restrain mold development

6. Remediation technicians will repair any damages caused by the growth and thoroughly clean the contaminated space.

7. Professionals will use their experience and knowledge to prepare for every situation and to know what to do and how best to handle the job.

At West Central Equipment and Restoration, we employ a comprehensive approach to mold remediation so you can be safe and confident.

We work quickly, methodically, safely, and effectively. Call now to schedule your mold remediation. For more information, visit the site “West Central Equipment and Restoration.”

Five Easy Steps to Proper Mold Removal

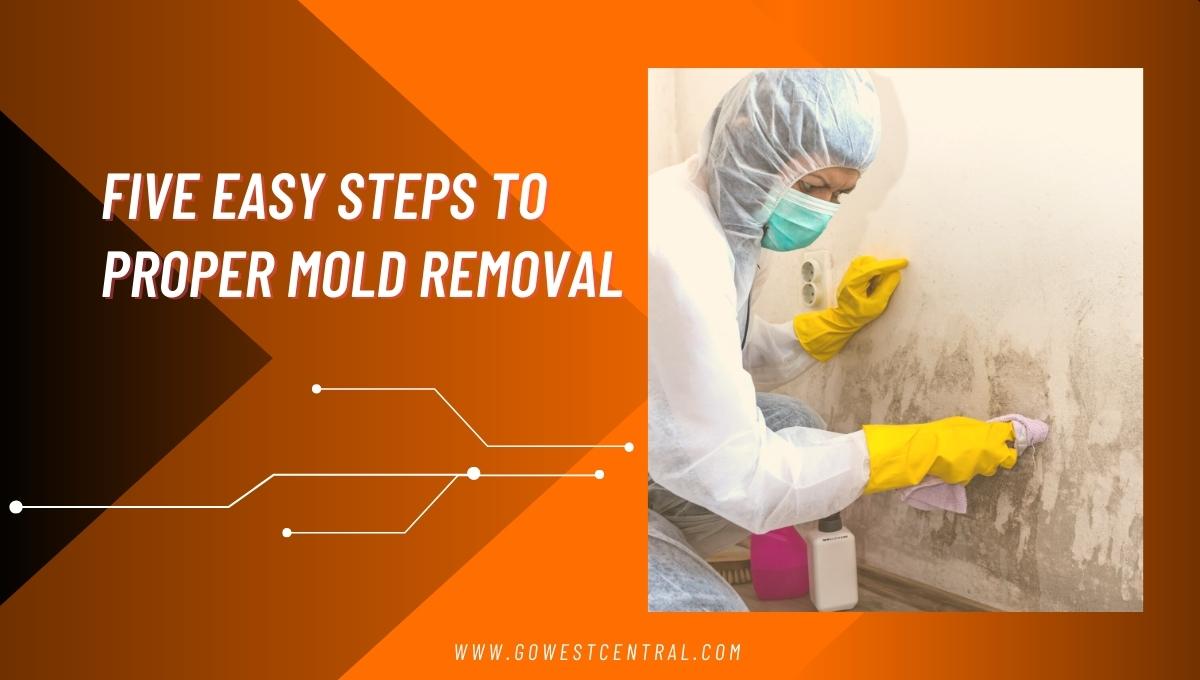
Mold is a rapidly growing and swiftly spreading fungus that uses tiny, invisible spores to reach and colonize new territories. You would not even realize it when it takes over your home. 

As long as oxygen and moisture are abundant in your property, mold will grow on virtually every surface they can find.

To minimize its destructive effects on wood, drywall, insulation, tiles, and fabrics, you should move quickly to remove mold as soon as you spot any growth. 

As you do that, remember to protect yourself from the spores and take precautions to prevent them from spreading beyond the affected areas.

What are the 5 steps of proper mold removal?

  1. Identify and tackle any moisture problems in your home

Behind every mold growth, there is usually a moisture or water problem. 

The first step in getting rid of mold is to know the moisture issues in your home. Identify where the moisture comes from, how it reaches your home, and how to eliminate it.

Check for both visible and invisible sources of moisture, particularly behind and around any mold growth that you can see. Also, check the corners and walls of your home.

Beyond removing the moisture, you should also seal the loopholes leading to increased dampness in your property.

  1. Develop a mold remediation plan

You must never start removing the mold without a proper remediation plan. You should carefully document the situation using videos, pictures, and writing to help you understand the magnitude of the problem.

Draw a plan that includes the scope of work needed to remove the mold thoroughly. Plan the when, how, and who to complete the removal and the techniques used. 

Documentation and planning may even uncover existing mold trends in your home and help you devise effective prevention measures.

  1. Determine the extent of the mold remediation

Since mold grows and spreads quickly, the growth in your home may be far more extensive than the areas you can most readily detect. 

Before you remove the mold, assess and determine the extent of the contamination. The degree of contamination will determine the approach you use to remove the growth.

There are three broad categories of mold contamination:

Level 1 contamination refers to small, isolated areas of mold growth, usually up to 10 square feet. For this level of contamination, you can remove the mold on your own.

Level 2 mold growth contamination covers an area of 10 to 30 square feet. You can still carry out remediation for this level of contamination on your own. Although, you will need better equipment, cleaning solutions, and techniques than for level 1. 

When the growth is larger than 30 square feet, it is categorized as level 3 and usually requires professional mold remediation.

  1. Perform the actual mold removal

Now that you’ve identified the water source, fixed it, documented the degree of contamination, determined the extent of spread, and planned the remediation process, you can now remove the mold. Ensure to carry out the removal process without exposing yourself or other unaffected areas.

You should remove the mold by:

(a) Repairing the water problem to prevent mold spores from growing.

(b) Isolating the contaminated area by closing doors and windows between the contaminated area and unaffected areas. An easier way to achieve this is to cover all doorways and other openings with six mil polyethylene sheeting and seal all sheeting seams with duct tape.

(c) Misting the contaminated areas to suppress dust

(d) Removing all wet and mold-damaged porous materials

(e) Packing wet, moldy and damaged materials in plastic bags for disposal. The plastic bags should be at least 6-mil thick. Ensure the materials are double bagged and that the bags are tied to close them. Wipe the bags on the outside with a damp cloth and detergent solution and discard them in a regular trash can.

(f) Using a wire brush to clean all moldy non-porous materials and woody surfaces. The surfaces are then wiped with disposable wipes, discarded after use in 6 mil polyethylene bags, double-bagged, and tied closed.

(g) Scrubbing moldy surfaces with damp cloth and detergent solution, ensuring all mold growths are removed. The surfaces are rinsed clean with water. This is only appropriate for level 1 contamination.

For level 2, vacuum all the affected surfaces with a HEPA vacuum before cleaning the surfaces with a damp cloth and a mop with a detergent solution. 

If it is level 3, professional mold cleanup is necessary. The wipes should be discarded as described above.

(h) Conducting a visibility test on all the cleaned areas to confirm they are free of contamination and with no dust and dirt.

(i) Drying all the cleaned materials and surfaces to ensure that all leftover moisture evaporates. You can speed up the drying process by using dehumidifiers or raising the indoor air temperature.

(j) Replacing or repairing all materials that were moved.

  1. Confirm whether the mold cleanup has been successful

Now that the mold is gone and there is no dust or dirt, you need to verify that your cleanup efforts have been successful. You can do this by running various tests. Simple procedures include:

  • Checking for the absence of mold odors.
  • Checking if the moisture problem has been successfully fixed.
  • Confirming that there are no visible signs of mold and mold-damaged materials. 

For thorough testing, you should hire a professional environmental testing company to run advanced tests to rule out the presence of mold spores in your home.

Thorough, trustworthy mold removal

Would you like help with mold removal in your property, particularly widespread contamination? 

At West Central Equipment and Restoration, we believe in swift, meticulous mold removal that leaves no visible mold, mold-damaged materials, moldy odors, or moisture problems.

We can help you implement a comprehensive mold remediation strategy that will ensure you occupy or re-occupy your home without adverse health problems. We will respond fast enough and do the cleanup right the first time. 

For more information on the prevention and removal of mold, call West Central Equipment and Restoration today!